
I’ve wanted to write this post for years. After this most recent escapade, I’ve had enough of GoDaddy’s shenanigans, and I’m going to let you in on what professional web developers know and discuss amongst themselves.
GoDaddy is terrible.
This is an open secret, and yet a decent number of new clients come to me with a domain name and/or web hosting through GoDaddy, and it always amazes me how they continue to somehow attract new clients. I imagine this is like that one model of car that all the mechanics know to run away from, but it’s popular among consumers because they don’t know things could actually be much, much better. That could probably be said for crappy web hosting of any kind, actually, but let’s stay on topic.
Is GoDaddy really that bad?
Yes.
Ask any web designer/developer with a reasonable amount of experience and you’ll hear something like this:
- they upsell everything, constantly
- they charge for things you can get for free and add hidden costs
- they prey on client’s ignorance about technical issues
- they lock you into multiyear registrations so you don’t want to leave (sunk cost fallacy)
- support is terrible – you’ll get a different answer from every person you talk to
Also, they don’t play nice with Cloudflare and things just break randomly… (???) To be fair, things break randomly on most websites, but for some reason, they break more often on GoDaddy hosting. 🤔
This list is just off the top of my head, mostly because every one of these elements are present in the story I’m about to tell you.
In 2020, I began working with a client who had an existing WordPress website at GoDaddy.
After my initial cleanup, we would make occasional changes and updates as needed. We have the site on a maintenance plan to make sure it’s being backed up, plugins updated and it’s being monitored for security issues. Obviously I don’t like that it’s on GoDaddy hosting, but if a new client has already paid for a year of something I totally understand. We make it work and then migrate when the plan ends. Usually.
One of the first things I did on this site was to route the domain name through Cloudflare, which I do for every client. It provides greater speed, security, and most importantly, free SSL. SSL is what adds the “s” to “https” in your URL (along with the padlock icon). After Google’s changes in 2018, this went from nice-to-have, to need-to-have. Your browser will give visitors a security warning if you don’t have this, so it matters. The original site did not have SSL at all.
You can get free SSL from a lot of web hosts (probably most of them). Not GoDaddy. Here’s a screenshot from a client’s account page:

It took some finagling – SSL is notoriously difficult to set up – but we got it done. That was sometime last fall.
This spring, the site broke out of nowhere. I can’t remember specifics at this point, but I think a lot of the images disappeared/ended up broken. Images and SSL are always tricky, but the site had been fine for months. However, my developer and I have both noticed that GoDaddy doesn’t seem to play nice with Cloudflare (I wonder why?) One of the benefits of having a system and maintaining a ton of different sites is that you start to notice patterns. When all variables are consistent except the hosting… it’s probably the hosting.
I fixed the issue somehow (the problem with troubleshooting is it’s hard to remember what ended up being successful). Life went on.
Cut to this past month… site goes down, support is terrible.
The site went down again. Just… down. Error. Unless an update broke the site (these things happen), no one had actually touched it. I contacted support and the first thing they said was to turn off Cloudflare. Of course. Then they said the domain wasn’t connected at all (no settings had been changed). I tried for way too long to get it to work with SSL through Cloudflare, then gave up on Cloudflare and reverted to the default GoDaddy settings just to make sure it was online. Unsurprisingly, support was worthless while trying to figure any of that out. Rote answers, no attempt to troubleshoot (see complaint #5). There were at least 3 different chat sessions.
After speaking with the client, they agreed to go ahead and move to my hosting. I immediately set up a new hosting account and quickly rebuilt the site from scratch. I didn’t want to migrate anything that was potentially corrupted (I did not create the original site). Back online, mission accomplished.
Then I went through the entire GoDaddy account to cancel the remaining hosting and send the client an update on what was actually in their account. This is what I found (shared with client’s permission and no identifying details):
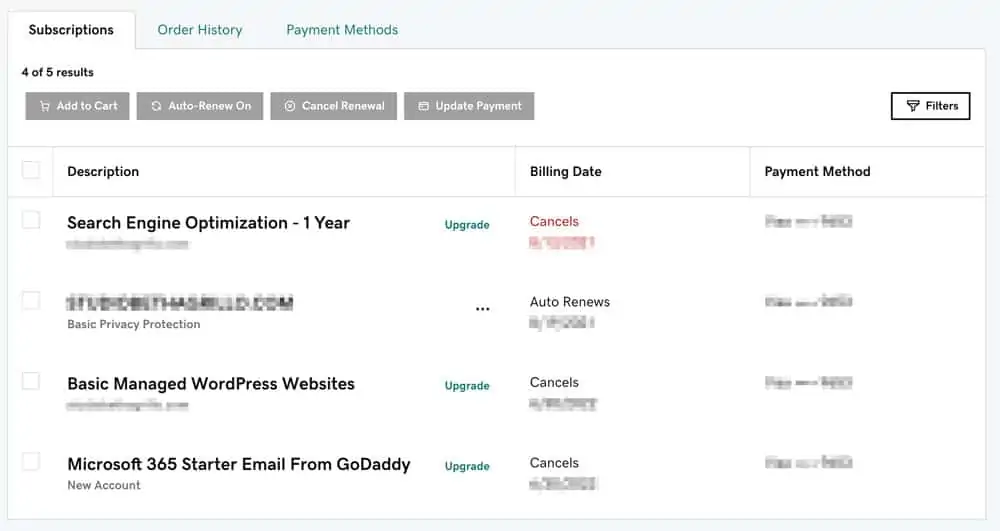
Let me point out the first thing I notice. This is a subscriptions page, and I took a screenshot of the full table. There are no prices in those columns. If you click on the item title, it still doesn’t show you a price. How am I supposed to figure out how much “Basic Managed WordPress Websites” will renew for? To be fair, navigating any part of their dashboard is a nightmare, but this is deceptive. I want to see, at a glance, how much each of these things cost.
At the top of the list you can see where it says “4 of 5 results.” That’s because the client’s 5th product is free, so it’s not listed here. It’s email forwarding (or an email alias), which is when [email protected] forwards to [email protected]. The client is perfectly happy with this (I mean, do any of us really want another email account?).
Now let’s go through each line item so we can understand my first complaint:
1. GoDaddy upsells everything, constantly
Item 1: Search Engine Optimization – 1 Year
What the heck is this? SEO isn’t just something you slap on to a website. It takes a ton of time, money and often on-page changes to headings, keywords, blogging on relevant topics, etc. No one is touching the website besides us. From the backend, it looked like you could create posts to share on social media or something. But when I searched on GoDaddy’s website, it looked like a tool that made SEO recommendations you could apply. Either way, it’s something my client has never used and probably didn’t even know they were paying for. This title makes it sound like someone is doing something, and could easily be fixed by adding the word ‘tool.’
Item 2: (Blurred)
This is the website domain name/URL, and the only thing on this list my client should actually be paying for. More on that in a second.
Item 3: Basic Managed WordPress Websites
This is the website hosting plan, which was originally for 3 years. Exhibit A of how they try to lock you in for crazy long time periods. I’m not sure I would pay up front for hosting for 3 years, and I’m a website hosting provider.
Item 4: Microsoft 365 Starter Email from GoDaddy
Remember how I mentioned this client uses email forwarding? Item 4 is an actual email account. It says “New Account” because it’s never been set up. My client has been paying for an unused email account. Why is that even in there?
But wait, there’s more!
2. GoDaddy adds hidden costs
In order to figure out how much these items cost, I had to switch to the Order History tab. I then discovered that the domain name had an add-on charge, which leads us to:
Item 5: Search Engine Visibility V1 Renewal.
Search engine visibility? Talk about a sentence designed to make consumers think it’s a magic bullet (let me interrupt this programming to tell you that there ARE no magic bullets for SEO, and anyone that tells you otherwise is a liar. It takes a ton of time and effort and it never ends).
So what is this?
Search Engine Visibility is an Internet-based search engine optimization and submission tool that guides users to optimize their website. Search Engine Visibility shows users how to improve internal and external aspects of their website. Doing this increases the visibility of the website in search engines via the “natural,” or unpaid, search results.
– GoDaddy Search Engine Visibility FAQ
Ah yes, another tool. Because what every business owner has is time to consult hard-to-navigate GoDaddy tools to optimize their website. That same GoDaddy page also says: “Once refined, use Search Engine Visibility’s site submission options to submit your site, correct any submission issues, and track number of pages indexed by various search engines.”
OK, so it sounds to me like this tool is just a way to submit a sitemap to Google? You can do that for free (Google Search Console). I do it for every site as part of our post-launch checklist. And yet this “Search Engine Visibility” product:
- Costs the same amount as a 2-year domain name renewal
- Has an incredibly deceptive title that’s going to make small business owners think they magically have better SEO without doing anything
- I have no idea if it’s included by default with the domain name renewal because the subscription page has no info on actual cost
- Why isn’t this part of the “Search Engine Optimization – 1 Year” line item?
This is why I’m now saying that GoDaddy shouldn’t even be allowed to register your domain name. Use Namecheap. Or talk to us and we’ll do it all for you so you never have to worry about it.
Can you see why every web designer/developer will warn you about GoDaddy upselling?
This is not the first time I’ve seen this kind of thing, either. Here’s another screenshot from a different client (also from 2020).
Again, Standard SSL could be had for free, backups are an upcharge and… security?
The page that comes up when I search “Website Security Essential” (which is like this whole separate per-month plan) says it includes SSL and one click restore from backup. Yet this client also has SSL and Website Backup listed here… ??? Is this one package that includes everything, or are you paying twice for a) backups from the Security package and b) standalone Website Backup 10GB? Did this site just need more space? What if you just subscribed to products in the wrong order?
Just browse their site and you can see how the way they list and describe their products is almost intentionally confusing. It’s not just the sales pages either; if you’ve ever tried to navigate the dashboard it’s terrible and buggy (I use software all day every day, and it took me 15+ minutes just to find the settings for the email alias).
Now, I understand that someone reading this might say, “OK, but what’s wrong with charging for website tools? It’s not their fault if customers don’t use them. After all, this person signed up for this stuff.”
That’s right, they did. More than likely because they were told they “needed” it because it was “important for SEO” or “a better deal to sign up for 15 years” or any other number of things. Every web host, – every business – upsells. It’s a strategy that makes sense if it’s a service your individual customer genuinely needs and you aren’t intentionally misleading people. This really feels like the latter, and it leads to my second point:
3. GoDaddy preys on their customers’ technical ignorance.
Small business owners know SEO is important, even if they don’t know how it works. So if they have a chance to buy something that sounds like it’s going to drop them on the front page of Google, why wouldn’t they? When I see something called “Search Engine Optimization – 1 Year,” why wouldn’t I assume that means GoDaddy is going to optimize my website for 1 year? And if I have no idea what’s involved in SEO, how would I know they’re not doing something?
Obviously we want consumers to do their due diligence, but in a world that’s increasingly technically complex, with more choices than ever before… this is just predatory. It makes me angry. It’s no different than a mechanic who adds a made-up charge to your bill because they know you don’t know any better. It’s unethical, and if you knew it was happening, you’d take your business elsewhere. But once you find out…
4. GoDaddy pushes customers into multi-year registrations
Well, you’ve already paid for 3 years, so guess you’ll just have to deal with it. They’re hoping at the end of those 3 years you forget before auto-renewal hits, because if you don’t notice within 30 days… sorry, no refunds. They’re taking advantage of the sunk-cost fallacy, which is when you don’t want to make a change because you’ve already invested so much time or money into something.
5. GoDaddy support is terrible.
You might already know this, but it’s fairly easy to outsource customer support to companies/services who will (I assume) read from a script or refer to a FAQ page to handle your website chat inquiries. I can often tell when I’m talking to one of these people, because they will have no comprehension of the actual topic. That’s what every GoDaddy chat felt like.
I’ve also made phone calls on behalf of clients in the past, and I remember one conversation where my client had said they told them to upgrade to a certain hosting plan because it was “faster.” When I repeated this to support, the guy I was speaking with scoffed at that and was like, they said what? Yeah, no, that’s not true. That’s been typical of my experience. Also see my above complaints after 3 chat sessions.
Now there are always exceptions, and there might be some web designers/developers who actually like GoDaddy, I guess? (I’ve never met any). I’d genuinely love to hear from them. But if you are a developer, you’d know when you’re being sold something you didn’t need, meaning your experience would be very different from the average small business owner.
Also, I’m not familiar with any of these products listed, and sure, they probably have genuinely useful features. There might even be people actively using them that love the options. I don’t have a problem with offering a tool – it’s about how it’s marketed (and to whom). I mean, when services or products are this convoluted, the conclusion I have to draw is that it’s intentional. It’s not any one technique that they’re using; it’s all of them taken together that paint a very sketchy picture.
I also feel like this is a great example of what happens when small business owners work with a massive company where you’re just another number in the system. There is no 1:1 relationship or personalized communication. They don’t know you, or your business, or your story. The importance of relationships with providers who really get your unique needs is why I’m such a proponent of entrepreneurship, consultants, and long-term, ongoing relationships with service providers. It can be so much better.
If you take nothing else from this, know that there are too many other good options for hosting to mess with one that toes the line. Don’t use GoDaddy.
Questions? Horror stories? Totally disagree with me? I’d love to hear all of it – leave a comment below.
Real advice real quick: if you have your domain name registered at GoDaddy, you’re probably fine as long as you make sure they aren’t adding any weird charges. If you want to leave, you can buy a domain transfer at Namecheap, unlock your domain at GoDaddy, verify and move it. Pretty straightforward. If you have hosting at GoDaddy, you’ll need to set up an account at another host, then migrate your site, which is bit more technical. We host all our website clients and can help with any of this if it’s intimidating.