
In this post I’m going to show you how to set up bleeds for printing, because it’s one of the most common designer errors I see. I’ll explain what bleed is and why it matters, then show you how to properly set up your files for print production.
Q: What is bleed?
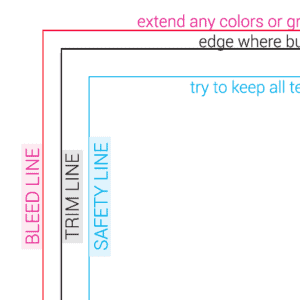
A: In general, bleed simply refers to any color, lines, or other graphics that extend past the trim line. In printing, when we say the art files need to have bleed, what we’re really saying is that the art needs to extend an extra 1/8” past the trim line. Bleed, in this context, is referring to that extra 1/8″.
Q: When does my file need to include bleeds?
A: When you have a design with any elements intended to “bleed off” the edge of the paper, you need to extend those elements an extra 1/8″ past the edge. The mistake is in designing the art to run right up to the edge, but not including that extra 1/8”.
Note: In the images below, the cyan border indicates the trim line. The magenta border indicates the bleed line.


Q: Why do I need to set up bleeds in my artwork?
A: If the item bleeds, it has to be trimmed. While this is done on a machine that’s very precise, there’s still the potential to be slightly off. Without bleed, the person trimming your business cards or brochure would have to trim exactly on the edge of the art – a hair off and you’d have a white line instead of color or graphic all the way to the edge.
See the objects flyer sample. I highlighted the 1/8″ bleed in magenta. Imagine if that pink background were actually printed. You can see how there would be a good chance of seeing a pink hairline on the edges of the flyer after trimming the incorrect file.


ok, so bleeds are important. how do i set them up?
Q: What size should my bleeds be?
A: For most print projects, the bleed should be 1/8″ (.125). There are exceptions; for large items like posters or signage, printers want more bleed, generally 1/2″ (.5).
Occasionally, printers don’t need bleed for larger items, but these cases are the exception, not the rule. And supposing no bleeds are needed, it’s easy to crop your artwork to size, but the reverse… not so much. It’s always better to build bleeds in at the beginning of the design process. Make sure when you set up your document size, you’re also setting up the bleed settings and extending your artwork.
Q: How do I set up bleeds in my art files?
A: The correct way to set up bleeds is in the page/document settings. Your software will add a magenta border outside the trim line so you know the minimum distance to extend your background color or pattern.
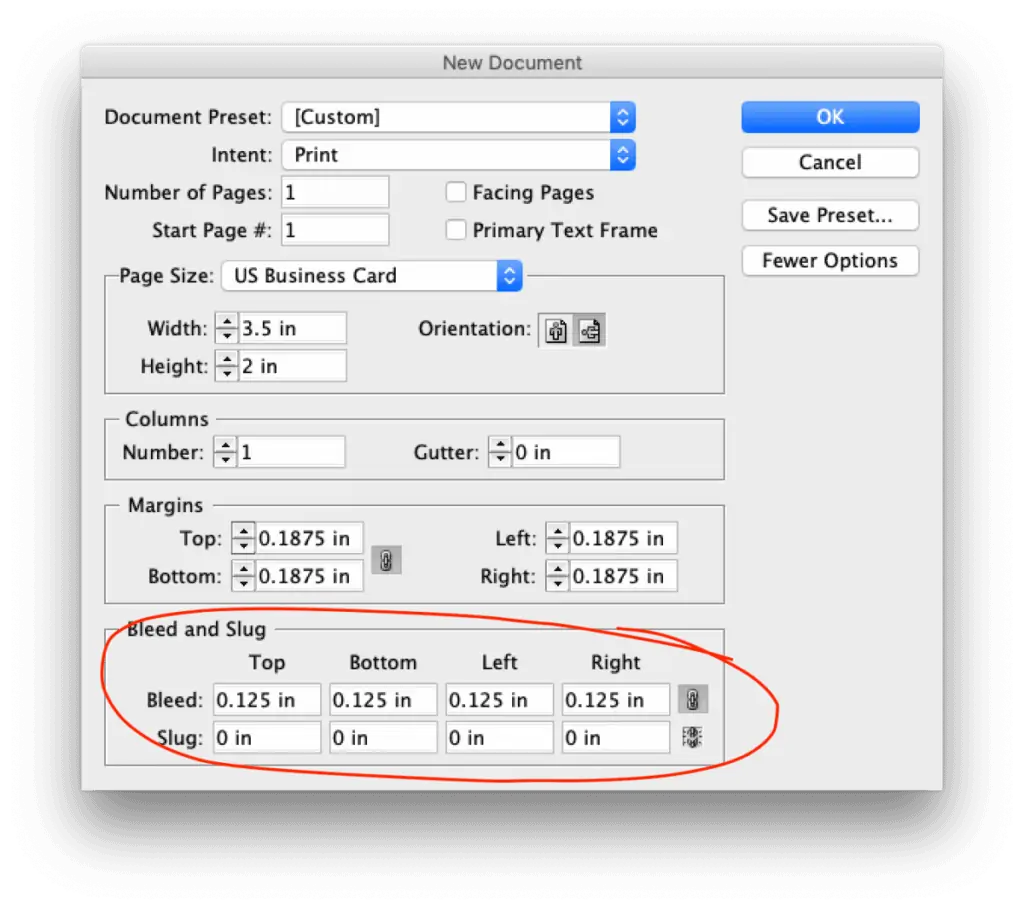
In InDesign, when you create a New Document, there will be bleed settings at the very bottom (you may have to click “More Options”). Set this to 1/8″ (.125″) on all sides. For an existing document, go to File > Document Setup > then add the .125″.
In Illustrator bleeds are also in the New Document window, or under File > Document Setup for existing documents.
It’s telling that Photoshop does not have bleed options; it should never be used for print layouts. However, if you find yourself having to export a PSD file for printing, simply make the document size 1/4″ larger than necessary and make sure the art extends to the edge. For example: if your project is intended to be 5″ x 7″ finished size, make your document size 5.25″ x 7.25″.
Q: How do I export my files for printing?
A: As a PDF with specified bleed settings. This is an important step; if you set up the file properly but forget this part your file will lack proper bleeds.
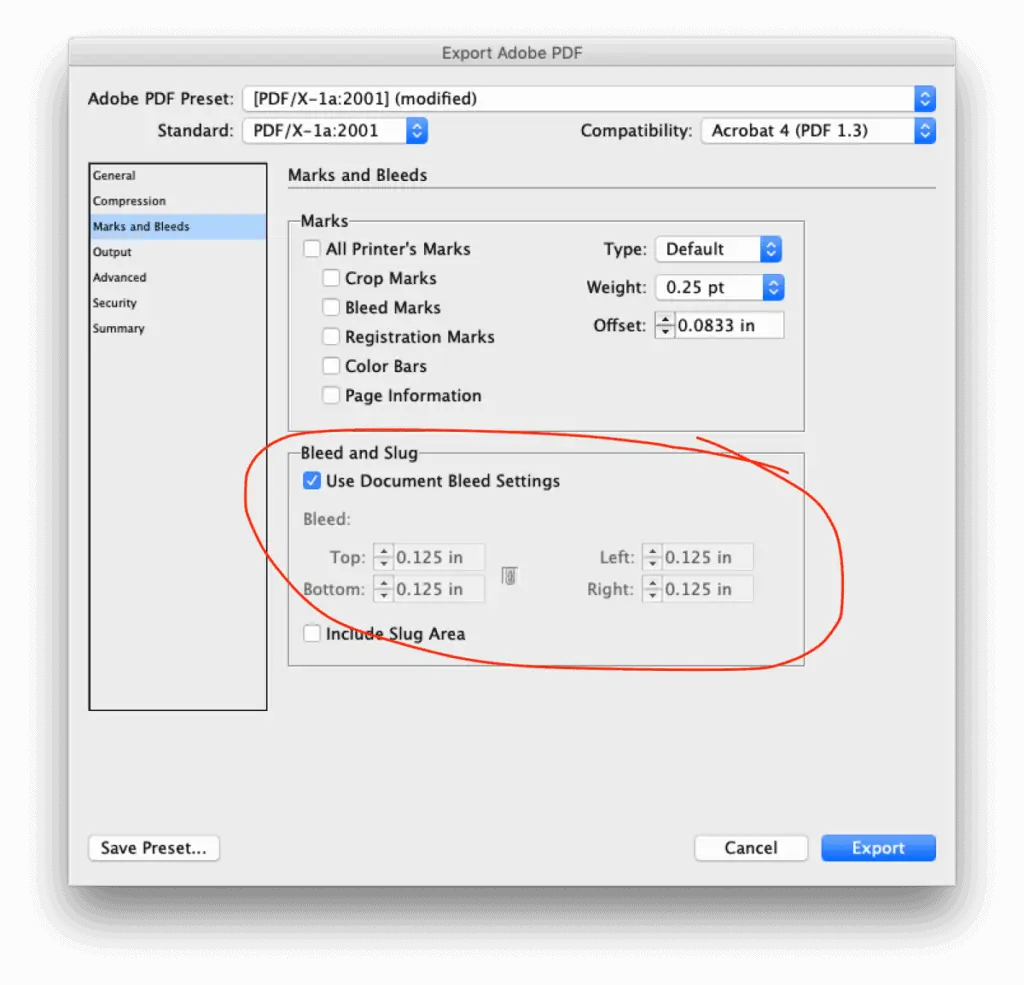
In InDesign, go to File > Adobe PDF Presets. Choose High Quality Print, or PDF/X-1a:2001 if your artwork has transparency. After you hit Save, you’ll see an Export Adobe PDF dialog box. Select the Marks and Bleeds tab on the left, then click “Use Document Bleed Setting.” If you set those up properly, it should change from 0 to .125″. Crop marks are optional and depend on the printer (they can still work with the file if you leave them off).
In Illustrator the process is the same, except that you will choose File > Save As > PDF, then change the Adobe PDF preset in the dropdown at the top.
Again, Photoshop should not be used for print files, but if you must, you generally should be saving as a TIF file. The process won’t be any different as long as you’ve made the document .25″ larger (5 x 7 becomes 5.25 x 7.25).
quick video of how to set up a new doc and export with bleeds
Hopefully this post has answered all your questions, and you now understand why bleeds matter and how to use them.
Curious about why a website agency has a post about bleeds for printing?
Well, we actually started out as a brand design + print agency, and this was a frequent topic that came up. These days we no longer offer printing (except for business cards as part of our Startup Package.).
We specialize in well-designed WordPress websites for professional service busineses, especially soloproneurs like consultants and coaches who need strategic consulting on how to build a better business.
Check out our website packages to learn more.