how to set up the best free invoicing software - Wave Apps
bookkeeping-wave blog post

If you’re starting a business (or even just doing a few projects on the side), you must use a billing/invoicing/accounting system to track income and expenses. A spreadsheet isn’t terrible, but come tax time you’ll need reports. Creatives: do NOT try to use design software to make fancy invoices. There’s no way to track these, and you’ll end up with a nightmare.

  • In the early days of cyclone press I used an invoicing software (without real accounting features).
  • Then I used Xero for a bit, which is an up-and-coming cloud option.
  • After switching to a new accountant (with special software pricing) I broke down and switched to Quickbooks Online, something I swore I’d never do. While there were a few nice things, it was overall as terrible as expected, particularly in the recurring invoice department (practically nonexistent).
  • 2 years ago I switched to Wave and have no regrets whatsoever.

Wave is now the billing software I recommend to all my clients, and the best part is that it’s totally free. I want to quickly outline why I like it, then give you a walkthrough of how to set up a new Wave account.

Wave Accounting Pros

  • Wave is clean, simple, and incredibly user-friendly. It does what it needs to do, beautifully.
  • Recurring invoices are a dream. Easy to set up, and more importantly, easy for clients to pay. They can choose to save credit card info for automatic payment.
  • Online payment setup is practically instant.
  • Reconciliation is unbelievably easy.
  • It’s easy to add and switch between multiple businesses.
  • Zapier integration.
  • If you need payroll, you can add it (although that service isn’t free).
  • It’s easy to add users (bookkeepers, tax preparers etc.)

Wave Accounting Cons

  • My biggest complaint is that there’s no way to add credits to a client accounts. I use renamed invoices with positive amounts instead, but it’s an annoying workaround.
  • Products are not searchable.
  • I’d like to see more Zapier options.
  • No time tracking. I don’t actually see this as a con: I’ve never used this as part of an invoicing system and I think it should be separate anyway, but just FYI. I use Timecamp for the bulk of my time tracking.
  • Ads. HR Block bought Wave in 2019 so they’re obviously going to give themselves ad space, and because the product is free they’re trying to make money somewhere. You might click on a tab to discover it’s a partnership with another B2B product. As long as they maintain Wave this doesn’t bother me.
  • No downloadable app (I despise in-browser apps). There are ways to run cloud apps as a standalone app on your desktop (on Mac) which is what I do.
  • No way to digitally accept estimates.
  • Because it’s free, updates are infrequent.

I feel like I should clarify the fact that all of my cons are just nice-to-have features, not actual needs. The top two are really the only things I’d like to see updates for, but I can’t be truly picky because again, Wave is totally free.

getting started with Wave Apps accounting software

Here's a quick how-to process to get your small business up and running with Wave. At the end of this tutorial, you'll be able to send invoices and receive online payment.

I'm no accountant, so none of this is legal/tax advice, but I do work with soloproneurs and startups to establish processes and set up software. If you need help getting set up with a business email address, branding or a website, get in touch.
how to set up the best free invoicing software - Wave Apps

Time Needed: 45 minutes

Cost

You'll need:

- business email address
- business bank account information
- bookkeeper/accountant name and email (optional)
- business logo, ideally transparent PNG
- business brand color code ("#000000")
- your sales tax rate (if you sell products)

Required tools:

- computer
- secure Internet connection

How to set up a Wave Apps account

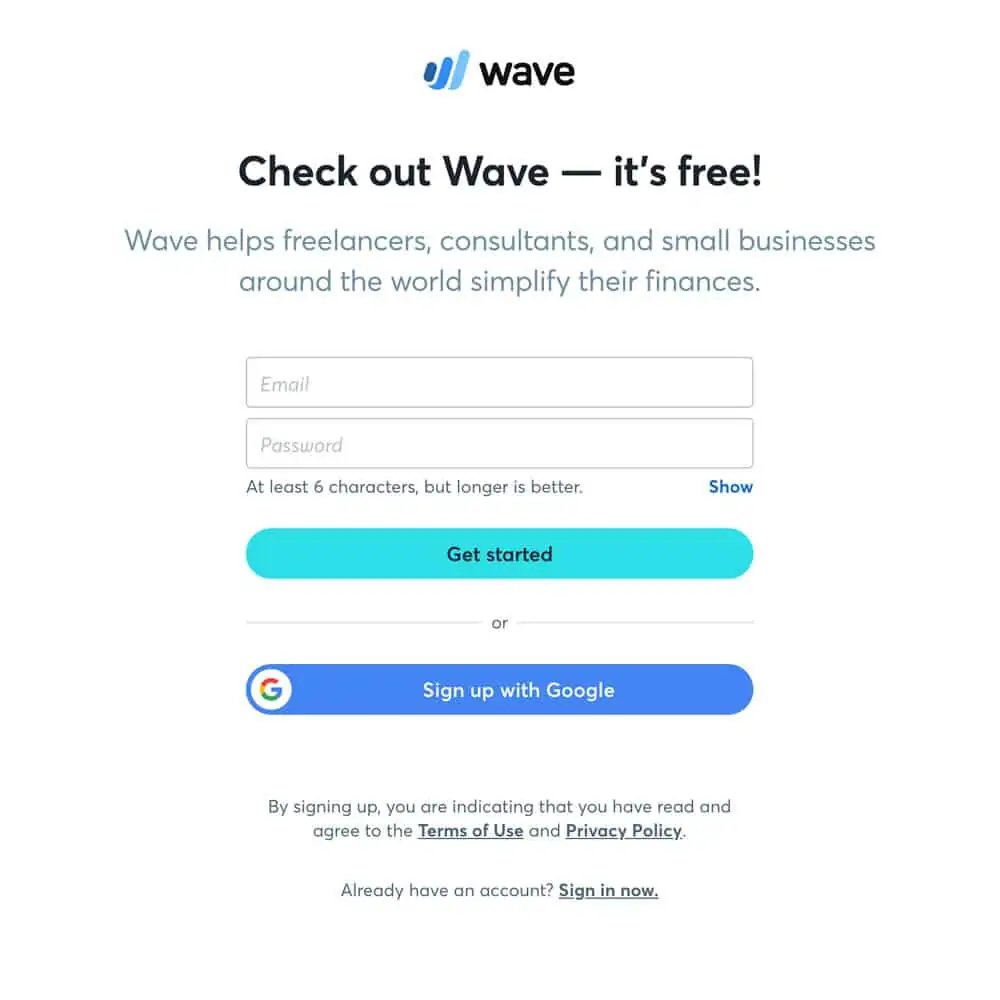
Step 1 : Sign up for a Wave account

Click the link above to open the Wave registration page in a new tab and follow along. You’ll want to sign up with your work email and a strong password (or log in with Google).
Step 2 : Create a business account

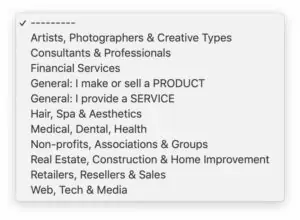
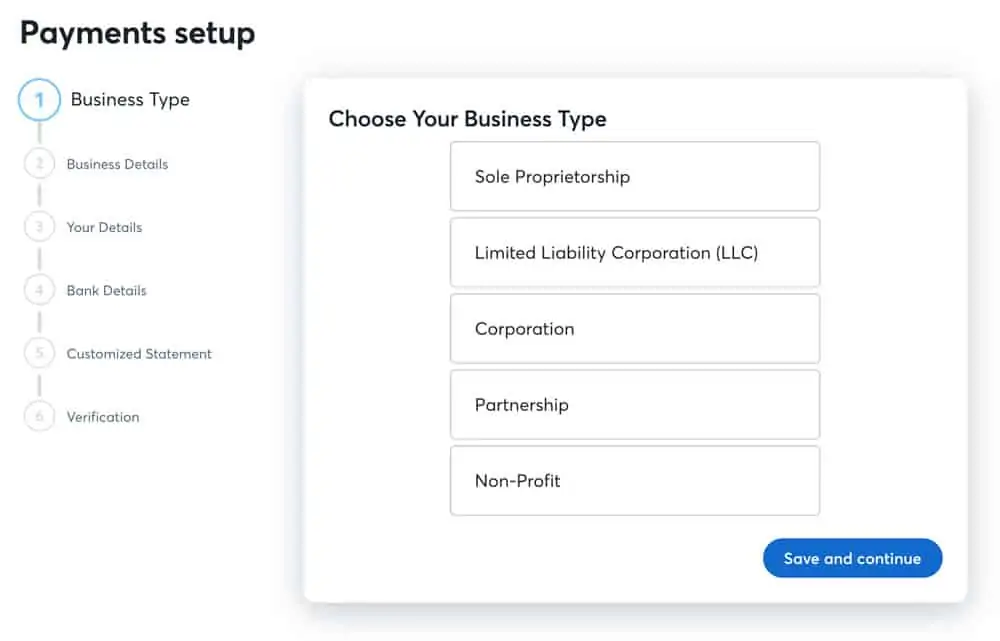
Follow the prompts to add the information for your business. Available business types are listed below.
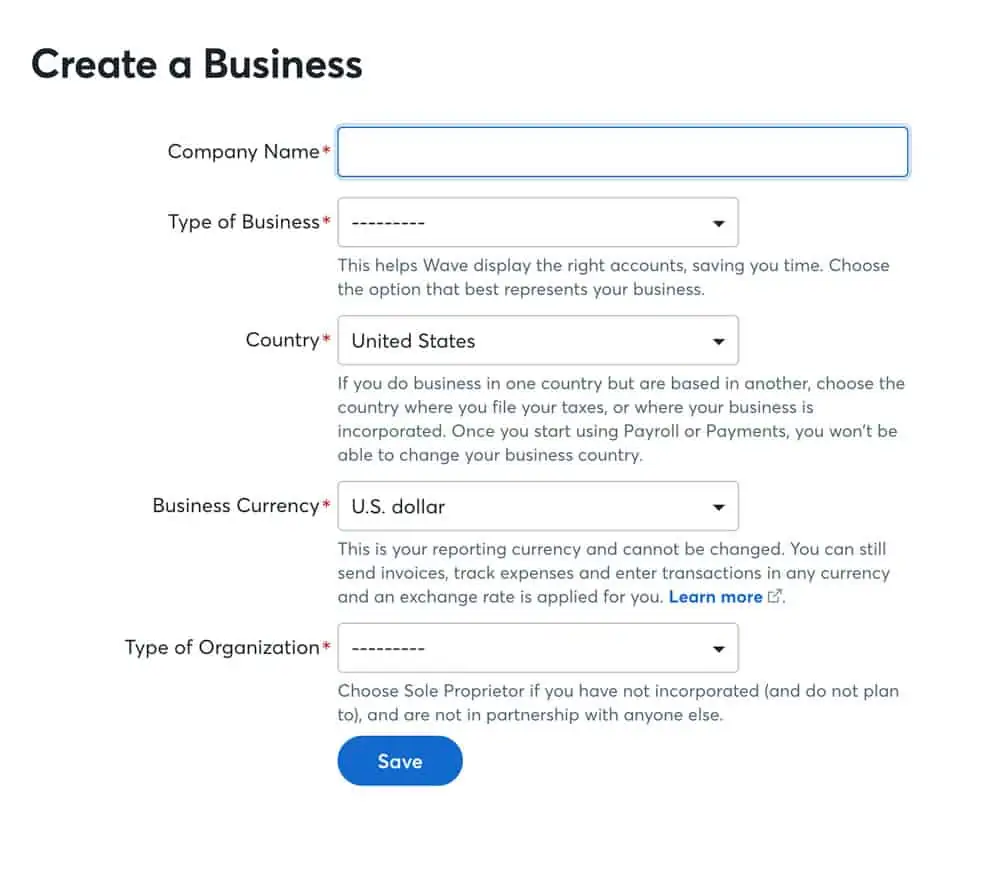
Step 3 : Invite your accountant or bookkeeper

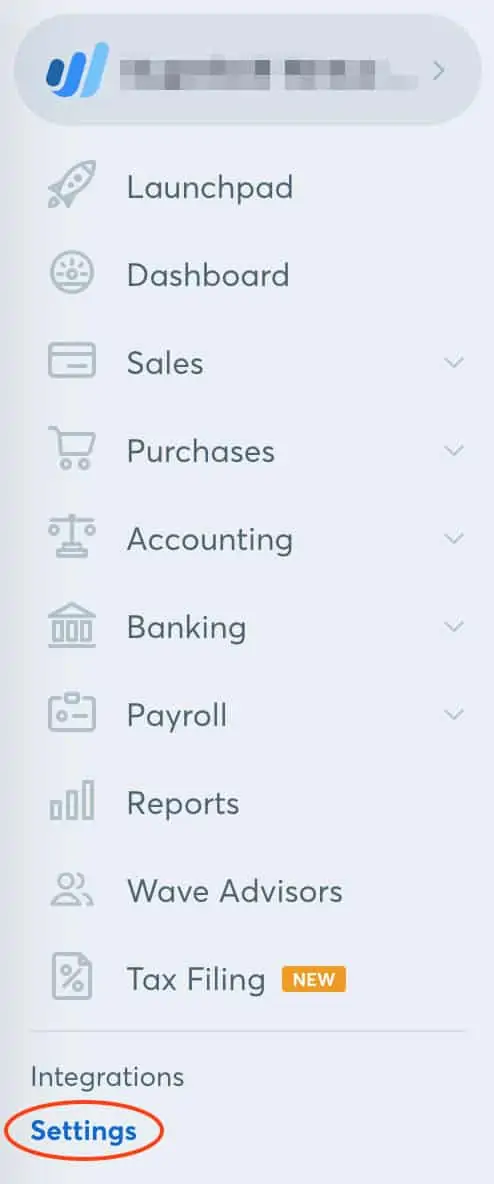
Chances are you’ll need to add another user to your account. You’ll find the option to invite users under ‘Settings’ in the sidebar, then ‘Users.’ There are currently 5 types of access level. Choose the appropriate level, then add your new user’s information. They’ll receive an invitation to join your account via email.
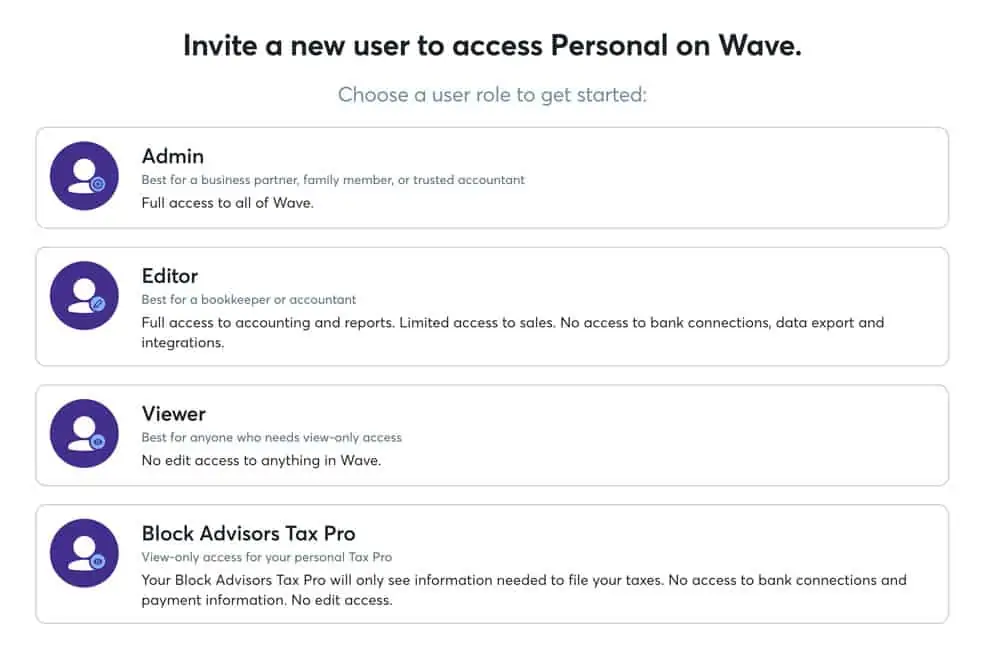
 

Step 4 : Customize the branding for your business

Under Settings, go to ‘Invoice Customization’. There are 3 invoice templates, an option to upload your logo and choose an accent color. While this doesn’t sound like much, the “Contemporary” template is well-designed so you don’t need to do much. Use a medium resolution PNG (with a transparent background) for your logo.

Now scroll down to customize your invoice terms, payment settings, and adjust units to your business. Make sure to ‘Save all changes.’
Step 5 : Adjust online payment options

Wave has their own payment processing system that makes it incredibly easy to accept online payments. Toggle these on and off as needed.
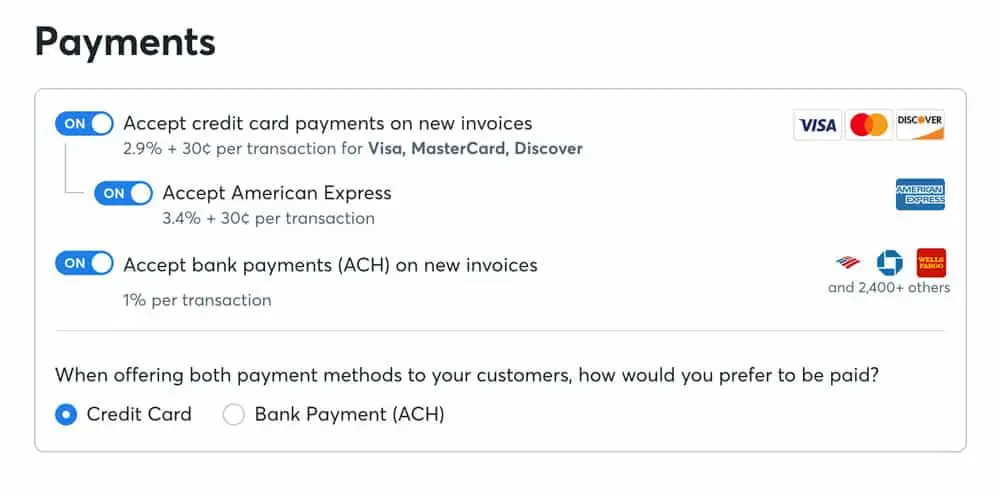
Step 6: Add sales tax (if you sell products)

Under Settings > Accounting, click ‘Sales Taxes’ add your sales tax rate, if needed.

Step 7: Add business bank account to receive payouts

Under Settings > Banking, click ‘Payouts’ and follow the prompts to add the bank account that online payments will deposit into.
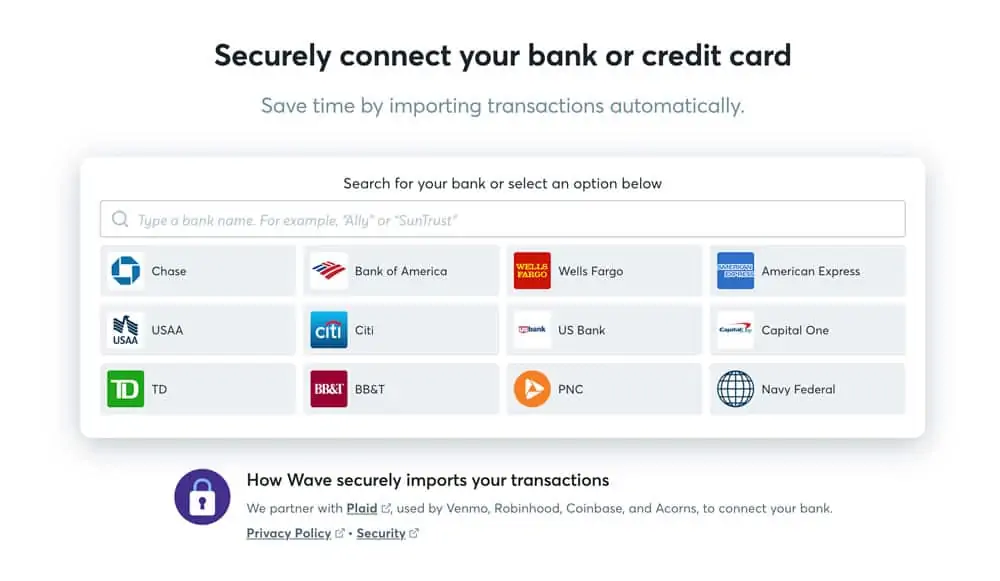
Step 8: Add your business bank account for tracking expenses

Once your account is set up, look for the ‘Banking’ tab on the sidebar, then click ‘Connected Accounts’ to add your business bank account. Start typing to search for your bank, then select it and log in with your online banking credentials.

Important note: always separate your personal and business expenses. Go set up a business bank account and use it for all business purchases and payments. Do not use your personal bank account for anything business related. This is rule number 1.
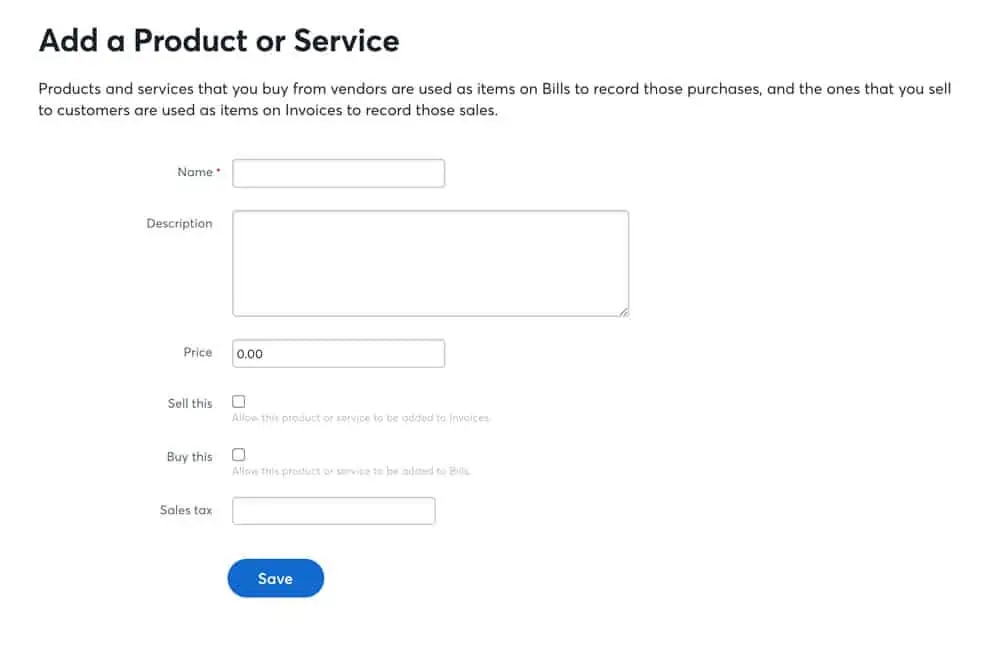
Step 9: Add standard products and/or services (optional)

If you charge an hourly rate or have a flagship product, you’ll want to add those under Sales > Products & Services. Make sure you’re choosing the correct income account when you set these up. When you select ‘Sell this,” it will give you the default option to add it to the ‘Sales’ income account.

To better track different income streams you’ll probably want to add additional accounts, which you can do under Accounting > Chart of Accounts. For example: the bulk of what we do at cyclone press is web design, development & hosting, but we also sell business cards and other printed products, which I track under a separate income account.
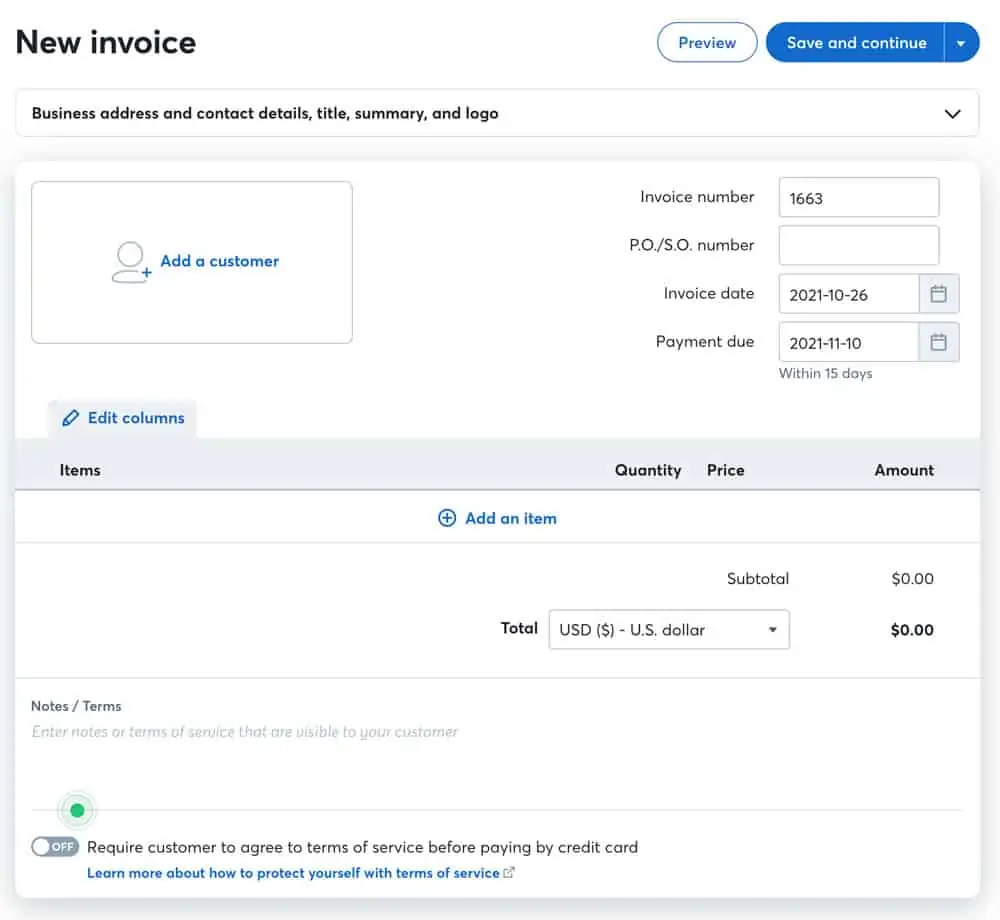
Step 10: Send your first invoice (or estimate)

At this point you’re ready to go. You can create an estimate, then convert it to an invoice when accepted. Or send out that invoice for the project that was the impetus to get an accounting system set up in the first place.

If you created a product, you can click to add it to the estimate or invoice, meaning the 5 minutes of up-front work to set it up is going to save you a ton of time in the long run.

Choose to include a message when you email it, and pick how often you want the client to receive reminders to pay.
There’s a lot more I could cover on the day-to-day use of Wave, but because it’s so user-friendly, it’s going to be fairly straightforward to figure out.

Do you have specific questions?

Drop them in the comments and I might do a follow-up post. There’s also a chat bot inside Wave you can use to find links to help articles in the Wave Help Center.

 

Website encryption changed a lot in 2018, so I’ve updated this post with the current state of website encryption and SSL certificates.

First, a quick explanation. We’re talking about the lock icon that’s displayed next to the URL in your address bar (see note at the end of this article about how this is changing).

The padlock (and the use of “https” instead of simply “http”) announces the presence of a Secure Sockets Layer (SSL), which encrypts the connection between your browser (Firefox, Safari, Chrome, Internet Explorer) and the website you’re visiting.

“SSL allows sensitive information such as credit card numbers, social security numbers, and login credentials to be transmitted securely. Normally, data sent between browsers and web servers is sent in plain text—leaving you vulnerable to eavesdropping. If an attacker is able to intercept all data being sent between a browser and a web server they can see and use that information.” via DigiCert.

To set this up, you would purchase an SSL certificate for your website URL and install it on your server. SSL certificates contain a pair of keys (public and private) used to establish a secure connection between the viewer and the website. If you’d like a rough analogy for how this works, click here.


Do You Need SSL? Yes.

Several years ago, when I originally wrote this post, I recommended purchasing SSL for the following reasons:

  • if you collect personal information through forms
  • if you collect credit card information/sell products
  • if customers log in to your website
  • if you have restricted content
  • if you wanted a potential SEO boost

Part of the reason for this criteria was because the average certificate cost an additional +$99 per year for hosting costs. It was a good practice to have it, but for a small business with nothing more than service options and contact forms it didn’t seem necessary.

However, in February 2018, Google announced that it would begin marking all HTTP sites as “not secure” in Chrome beginning in July 2018. Since Chrome is currently the most popular Internet browser, this is a big deal. It’s not like your site suddenly became less secure, it just looks that way, particularly to someone who might not understand the nuance of browser security warnings.

We include SSL certificates free of charge with every website we build.

No longer a nice option; SSL is now a must have for every small business on the web. This is also a great example of the power an industry behemoth has – if Google even announces they’re thinking about a change, everyone stops and listens. In this case, it’s a good thing, because it’s making the web more secure.

Important Note About the SSL Icon:

Google is changing the style of the padlock icon. “Users should expect that the web is safe by default, and they’ll be warned when there’s an issue. Since we’ll soon start marking all HTTP pages as “not secure”, we’ll step towards removing Chrome’s positive security indicators so that the default unmarked state is secure.”

This means that instead of looking for a padlock, you won’t even have to think about a secure connection unless you get the red “not secure” notice (in Chrome). This is beginning October 2018.


I hope this article was informative, practical, and gives you a decent idea of how SSL certificates work and why they’re now a must for every business. Keep in mind that while this is a best practice, it doesn’t mean that every website will abide by it. Always check for SSL when submitting credit card or personal information online. Thanks for reading and feel free to ask questions in the comments below.

If we built/maintain your website, you already have SSL. If you’d like us to send you an estimate to build a new WordPress site (or redesign an existing website), schedule a discovery call.

I recently received an email from a new freelance designer about a project that hadn’t gone well. If you’ve been working in design for any length of time it’s a familiar story, unfortunately.

Client is a friend. Pricing is set within a certain range. Work begins, but the business partner has different ideas. It takes hours of work to make both people happy. When the project is complete, the partner refuses to pay the (reasonable) billed amount. Why? Because it’s a measly bit higher than a mass logo design website.

The designer asked how to avoid this in the future, and I typed out a massive email. Because these problems are so common I’m posting an edited version here in hopes it will help other designers.

If you’re a small business owner or project manager who works with designers, I’ve got tips for you too. To jump to that section, click here.


working as a designer?

1) Require a down payment.

Every time. Don’t touch a thing until the client has given you 50% down on the project. If they’re serious, they’ll pay a deposit. If they aren’t serious, you’ll find out quick without wasted time. I know this feels like a pain, but do it anyway, for everyone.

2) Use an invoicing system.

Pricing should be in writing, but it’s more professional (and easier to reference) if it’s not in the body of an email. If you’re testing the freelance waters, you can use Harvest for free for 2 projects a month (I thought FreshBooks had a free version, but it appears it’s now only a free trial). I was also just informed Wave Apps is free and it seems pretty slick. A discussion of the best invoicing options is beyond the scope of this article, so pick something and use it. Just use something (and I don’t mean InDesign).

3) Get more information up front.

For logo design, you need to know details about your client’s business, like target market, color preferences, et cetera. At minimum, ask for examples of logos they like so you can get a feel for the design style they’re trying to achieve. Sometimes those examples will be all over the place, and sometimes people have no idea what they want. This won’t magically solve a fuzzy design brief (clients, see point #1 below) but it will prevent some obvious miscommunication.

4) Track your time and notify.

I don’t feel like I should have to say this, but use a time tracker. Many invoicing systems will include one. Otherwise, use an app. See this post for a brief recap of the tracker I use. If you’re working, have a timer running. Period.

Have an idea of how much time you expect to spend on a design before you start. If time starts creeping up, notify them early you’re running out of hours. Guys, I’ll be honest, if you’re a perfectionist, this never gets any easier. I (still) might spend an extra hour or more tidying up things in a complex piece that no one will ever notice. You have to make that call. Sometimes making sure the margins are perfect to a 10th of an inch is something I choose to do because I’m ridiculous. Just be aware of it.

5) Price hourly to start.

In the beginning, hourly design rates will help you keep track of time. Guesstimate your hours x your rate and there’s your estimate. For example: 2-3 hours x 50/hour = $100-150. If they ask for something complex while design is in progress, inform them it will take you another hour (or whatever). Just don’t start doing it without assessing how it’s going to affect your time, and let them make that call.

When you’re first starting out, keep your skill level in mind with your estimates. If the project requires learning a new technique, give yourself some extra time. Learn the technique first, track time only as you apply it, and know there might be an unpaid hour in there to polish it up. That’s just how you learn, and it’s why experienced designers can charge more per hour.

6) Work with the decision maker.

If there’s more than one decision maker involved, ask yourself if you really want to work on this project. If yes, work directly with the decision maker, not the administrative assistant or the janitor or the customer in the waiting room. If the design involves a committee, don’t do it. I mean, you can if you want, but don’t say I didn’t warn you.

7) If there’s a second decision maker who wants to use a design site, or “knows someone”, walk away.

 Nothing you do will ever be as good as the imaginary other guy in the business partner’s head. Trust me on this.


working with a designer?

1) Know what you want (roughly) before you try to work with a designer.

The more clear you are with what you want, the better the final product will be. This is especially true if you have a business partner. Don’t assume you agree on design style until you’ve actually talked about it. The business partners in our story should have decided on their vision for the logo before they ever hired the designer. They may not even have known there was conflict, but if they’d both provided samples it would have become clear quickly. Your designer is not your mediator.

The more experienced the designer you’re working with, the more rough your outline can be. Experienced designers can fill in the gaps by asking the right questions.

2) Do your research.

Don’t choose a designer because they’re in your networking group. Especially when it comes to logo design – take the time to actually look at their portfolio. If they don’t have one, that’s a red flag. If their work sucks, well, don’t hire them. You won’t know if you don’t look.

If you know nothing about logo design or branding for small business, google a few articles so you have a rough idea of what to look for (here’s one). This will help you ask the right questions and identify who knows what they’re doing and who doesn’t. The same goes for website design. I was once asked to quote a redesign on a website I thought had been around for a while. Turns out it was less than a year old, but was built using old software and styling. Don’t let this happen to you.

We’re all about education around here, so I’ll try to write more on these topics, but if you have questions, please ask.

3) Pick a project lead.

Decide who’s got point and filter feedback through them. Bad: both business partners, the secretary and the sales guy all individually emailing the designer changes. Good: those people sending their feedback to a single point of contact within their organization. That person then assesses it, decides if the team needs to discuss, then sends one email to the designer with requested edits that are not in conflict.

If you don’t assign a single point of contact, it’s likely that the designer will end up correcting grammatical changes that were previously “fixed” by other staff members or adding colors that were already vetoed by the partners (the secretary wasn’t in that meeting). Prevent wasted time and energy by choosing a project lead before starting the project. Your designer will thank you for it.

4) Don’t make decisions based on price alone.

In this post we happen to be discussing logo design (although you should be thinking brand design, which involves much more). Your logo is the mark that will be on your website, every marketing piece and business card printed. A logo is like a tattoo for your business. There’s never a good reason to get a cheap tattoo. If you’re committed to your small business, do it right the first time. Professional presentation can make the difference between whether or not someone chooses to work with you.

So on that note, please don’t use bargain bin logo design websites. No designer worth their salt has an ounce of respect for these sites. They’re notorious for ripping off, even impersonating, other designers. Do you really want to take that risk? I’m not saying every designer who works through a crowd-sourced site is a hack or a thief, but it’s a good way to find the ones who are.

In small business and entrepreneurship, it’s all about building relationships and trust. Word of mouth referrals are everything. Ask around and see who knows someone locally.

I believe it’s best to work consistently with the same providers. I’ve structured my entire business around being your consultant and point of contact for all things design, print and web. Even if I refer out for something we don’t do (SEO, video) I will help you navigate those providers, then work with them directly. When you work with cyclone press, we know you, we know your business, we know your branding. We’re right here in Kansas City and we’re only a phone call away.

10 Questions to Ask Before Hiring a Web Designer